While the winter season is still a long way off, its definitely not for a crocheter with a long list of crochet gifts! If you are looking for a cute and fun project for children, look no further! This Kids Fingerless Gloves is very easy and needs less a skein to finish a pair.
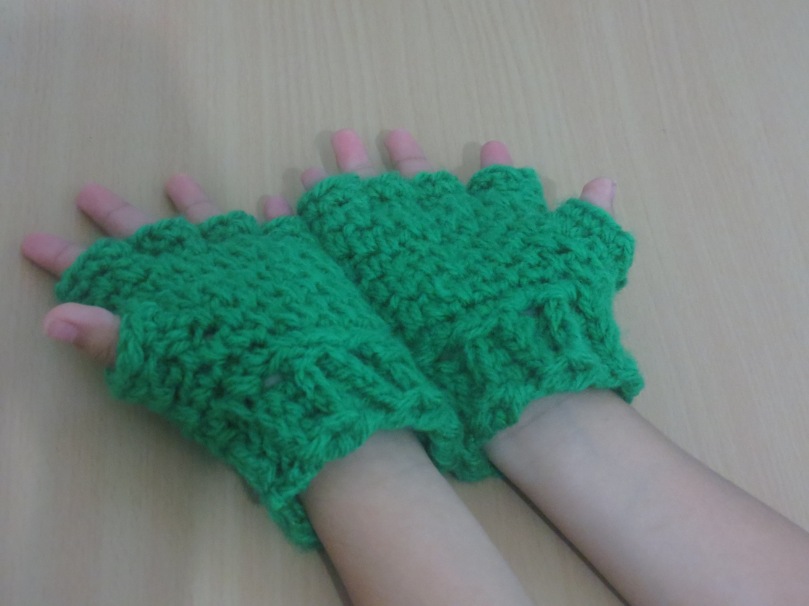 This is especially a great gift for children of all ages! The Moss stitch or Granite stitch that we will use for the palm is thick and warm and creates a texture for the gloves.
Materials:
Yarn: No.4 Medium thick acrylic yarn (I used less a skein of color Green)
Crochet Hook: 5:00 mm
Scissors
Needle
Notes:
The ch 2 that we will skip when we ch 6 is counted as a dc
You can make the gloves smaller or bigger by decreasing or increasing the rows for the wrist and the rows for the palm
The stitch that we will use for the palm is the Moss stitch.
The size that I made is for a 5 yr.old
Abbreviation:
sk-skip
st-stitch
ch- chain
sts-stitches
sl-slip stitch
sc-single crochet
dc-double crochet
fpdc-front post double crochet
bpdc-back post double crochet
Pattern:
Make 2
ch 6
Row 1: Make 1 dc on the third ch from the hook, Make 1 dc in the next 3 sts. (5sts)
Row 2: Ch 1 and turn. Make fpdc on every dc across. (including the ch 2) (5sts)
Row 3: Ch 1 and turn. Make bpdc on every dc from the previous row. (5sts)
Row 4-11: Repeat Row 2-3 until you reach the length of the wrist around.
Row 12: Turn your work and grab the row 1. Sl to the 1st ch and the st in your current row. Keep on making sl across. (5sl)
Row 13: Ch 1 make sc on the side of the dc. make 2sc for each row of a dc. Sl to the 1st sc (22sts)
Row 14: Ch 1 and make a sc on the 1st st. *ch1 and sk 1 st. make a sc on the next st repeat from*ch 1 and slip st to the 1st sc. (11 sts)
Row 15: Ch 2 and sk the 1st st. Make a sc on the sk st from the previous row. * ch 1 and make a sc on the next sk st from the previous row. Repeat from* (11sts)
Row 16: Repeat row 14 except when you are at the end of this row, do not ch 1 and sl, just ch 2 and turn your work. (11sts)
Row 17: Repeat row 15. Do not sl at the end just ch 1 and turn your work. (11sts)
Row 18: Repeat row 16 (11sts)
Row 19: Repeat row 17 (11sts)
Row 20: Repeat Row 18. After the last sc for this row, ch 1 and sl to the 1st st. (11sts)
Row 21: Repeat Row 15 (11sts)
Row 22: Repeat Row 14 (11sts)
Row 23: Repeat Row 15 (11 sts)
Row 24: Repeat Row 14 once more (11sts)
Row 25: For the 1st finger ( the pointer) ch 1 make sc until you have made three sc. ch 1 and turn around make sc on the 3rd sc from the sl and make another sc on that st. make 3 more sc and sl to the 1st st. (7sts)
Row 26: Make sc across, sl to the 1st sc, ch 1 and fasten off
For the two middle fingers
Row 25: insert your hook and yarn on where we had made the third and fourth sc from the previous finger and ch 1. Make 3 sc and ch 1. turn your work and make sc on the 3rd st from where we insert the hook earlier. make another sc on that sc and make 3 scon the next sts. Sl to the 1st sc. (7sts)
Row 26: Make sc across, sl to the 1st sc, ch 1 and fasten off (7sts)
For the last finger
Repeat what we did in the the 1st finger. (6sts)
For the thumb
Row 1: Insert your hook and yarn any where in the whole for the thumb. Ch 1 and make 9 sc around. Sl to the 1st st (9sts)
Row 2: Ch 1 and make sc around. Sl to the 1st st, ch 1 and fasten off. (9sts)
Sew in the ends with a needle and enjoy!
( Do not copy and paste, post in a different website, or sell my patterns by calling it your own. You may sell items made from my pattern. Please remember to link back to my website Crochetiveness.wordpress.com )
